
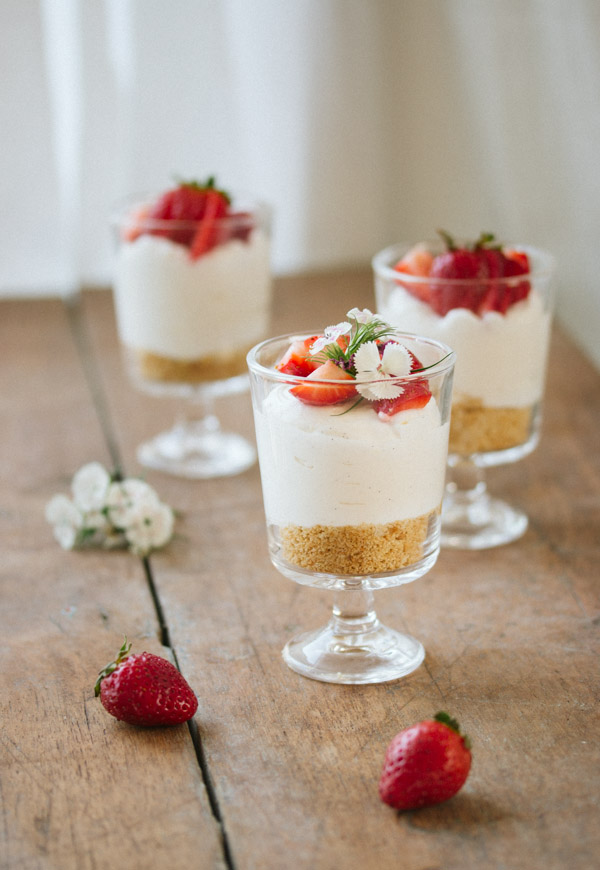
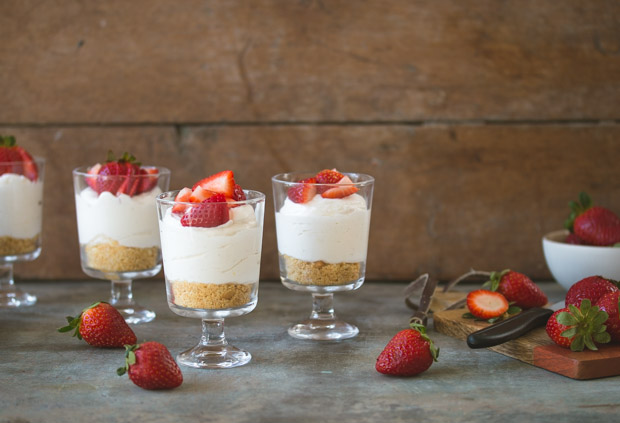
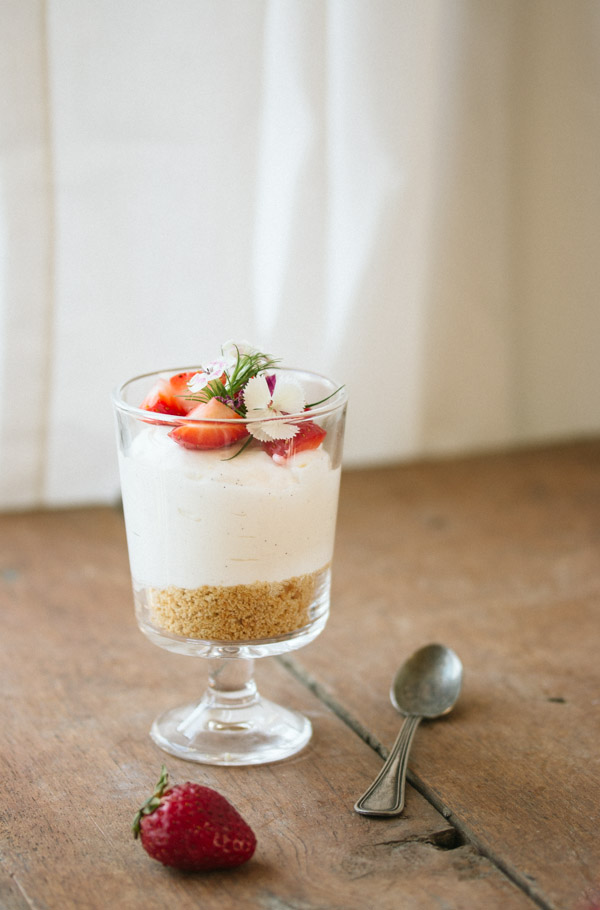
Creamy and mousse-like, these no-bake cheesecakes are served in individual cups for the perfect dessert. They’re rich, decadent, and so incredibly simple to make! A guaranteed crowd pleaser.
Even though it’s still pretty warm here, fall is right around the corner and I’ve been recipe testing lots of yummy pumpkin and apple-filled recipes. But this week I was really craving something cold and didn’t feel like turning on my oven. So I decided to whip up a batch of these hassle-free, no bake cheesecake cups because they are probably one of the simplest recipes to make and taste like absolute heaven.
The bottom layer is made of cookie crumbs, and the filling is a rich, creamy cheesecake mousse. And it tastes even better than it sounds. Plus, I just love deserts served in jars or glasses, don’t you? It makes them look so ornate and unique.

As an Amazon Associate, I earn from qualifying purchases. I endorse products that I love and use daily.
How to make individual cheesecake cups
- Make the crust. In a bowl, mix together graham cracker or other cookie crumbs and melted butter until the crumbs are completely moistened – they should feel like wet sand. Then, divide them evenly and press them firmly into your serving cups to form a crust
- Make the filling. In an electric stand mixer fitted with the paddle attachment or using a handheld mixer, beat the cream cheese with sugar until smooth. If the cream cheese is soft enough, you can do this by hand with a whisk, but I find that a mixer is much easier. Combine the lemon zest and vanilla. Lastly, whip the cream in a separate mixing bowl until soft peaks form, and fold the cream into the cream cheese using a rubber spatula until completely combined.
- Put into cups. Use a spoon or piping bag to evenly place the cheesecake filling on top of the crusts.
- Garnish. You can use any fruit that goes well with cheesecake as a garnish, like strawberries, cherries, raspberries, blueberries, or any tropical fruits. I love to use whatever is in season.
- Storage. Keep these cheesecakes refrigerated until serving.
Tips for making individual cheesecake cups
- Temperature:
- Make sure the cream is cold before whipping. Otherwise, it may not whip up into nice, fluffy cream.
- To avoid lumpy cheesecake batter, make sure the cream cheese is room temperature before beating it together with the sugar.
- Garnish:
- If using fresh berries that aren’t quite sweet enough, toss them with a bit of granulated sugar. Evn if they do have enough natural sweetness, you may want to toss them with lemon juice, zest, or berry jam for extra flavor.
- You can also top the cheesecakes with chocolate ganache, lemon curd, berry sauce, jam, or sugared nuts.
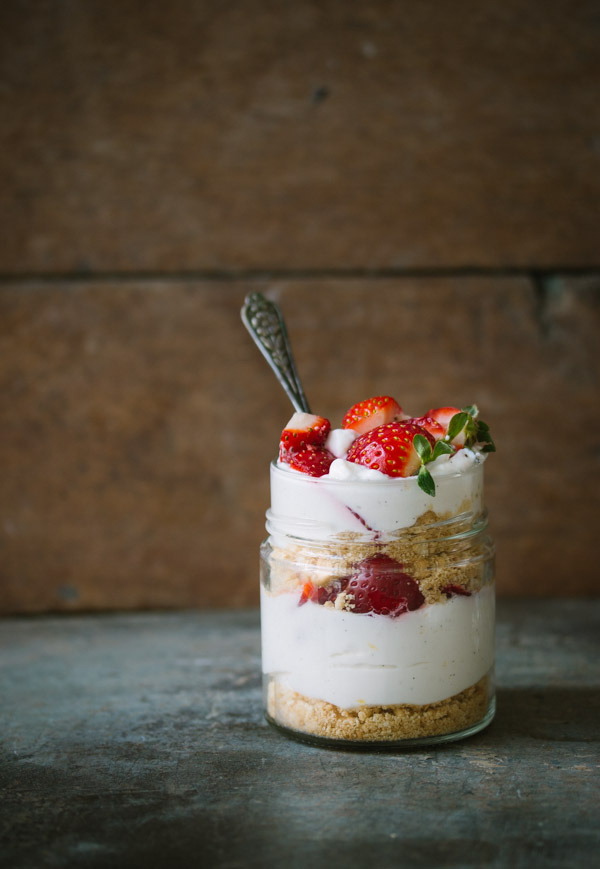
- Another option is to use this same recipe to make individual trifles, which means arranging it in layers. I made one trifle in a jar, as you can see below, to give you an idea of what it looks like. For a trifle variation, fresh berries or lemon curd is especially good.
- Cream cheese: Use bricks of full-fat cream cheese for this recipe. Cream cheese that comes in tubs is less firm, typically because it is lower in fat and won’t work as well for this recipe.
As an Amazon Associate, I earn from qualifying purchases. I endorse products that I love and use daily.
More delicious cheesecake recipes:
- Individual White Chocolate Cheesecake: Another delicious individual dessert, these creamy white chocolate cheesecakes are bursting with chocolatey flavor.
- Salted Caramel Cheesecake Mousse: Light, rich and airy, this salted caramel cheesecake mousse is absolutely indescribable.
- Biscoff Cheesecake: Cookie butter fans, unite! Biscoff cheesecake is an absolutely sinful dessert everyone will go gaga for.
- Nutella Cheesecake: Nothing has my heart quite like Nutella, and this velvety smooth Nutella cheesecake is full of rich chocolate and hazelnut flavors that everyone will love.
Individual No-Bake Cheesecake
Creamy, rich, and smooth, these no-bake cheesecake cups are easy to make and taste amazing.
Ingredients
For the Crust:
- ¾ cup (85g) graham cracker/digestive biscuit/vanilla cookie crumbs (pulse in a food processor or blender until finely ground.)
- 2 tablespoons (25g) unsalted butter, melted
For the Cheesecake Filling:
- 8 oz (225g) cream cheese, at room temperature
- ½ cup (100g) granulated sugar
- 1 teaspoon pure vanilla extract
- 1-2 teaspoons lemon zest, optional
- 1 cup (240 ml) heavy cream
- Diced fresh fruit, for topping
Instructions
-
Make the crust: In a medium bowl, mix together crumbs and melted butter until combined and crumbs are moistened. Divide evenly between individual serving dishes (about 2 tablespoons per serving dish). Press on the mixture with your fingers to form a crust layer.
-
Make the filling:
In a large bowl, combine cream cheese and sugar, and whisk well until combined and completely smooth. You can also use an electric stand mixer fitted with the paddle attachment to beat the cream cheese, or use a handheld mixer.
-
Add in vanilla and lemon zest. Set aside to let sugar dissolve into the cream cheese.
-
Using an electric mixer fitted with the whisk attachment, whisk heavy cream until soft peaks form. Avoid overbeating. Using a rubber spatula, gently fold half of the whipped cream into the cream cheese mixture, then fold in the other half.
-
Evenly spoon (or pipe using a piping bag) about ½ cup of filling into each serving dish.
-
Top with fresh fruit or any other topping you like (read above post for suggestions). Cover and place in the fridge for at least one hour before serving, or up to 2-3 days.