
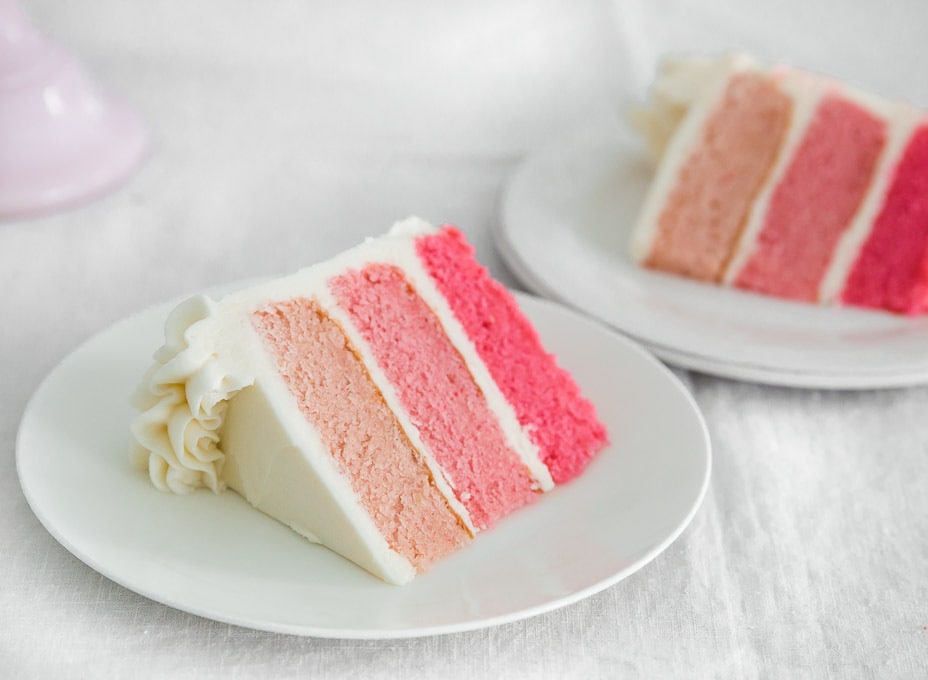
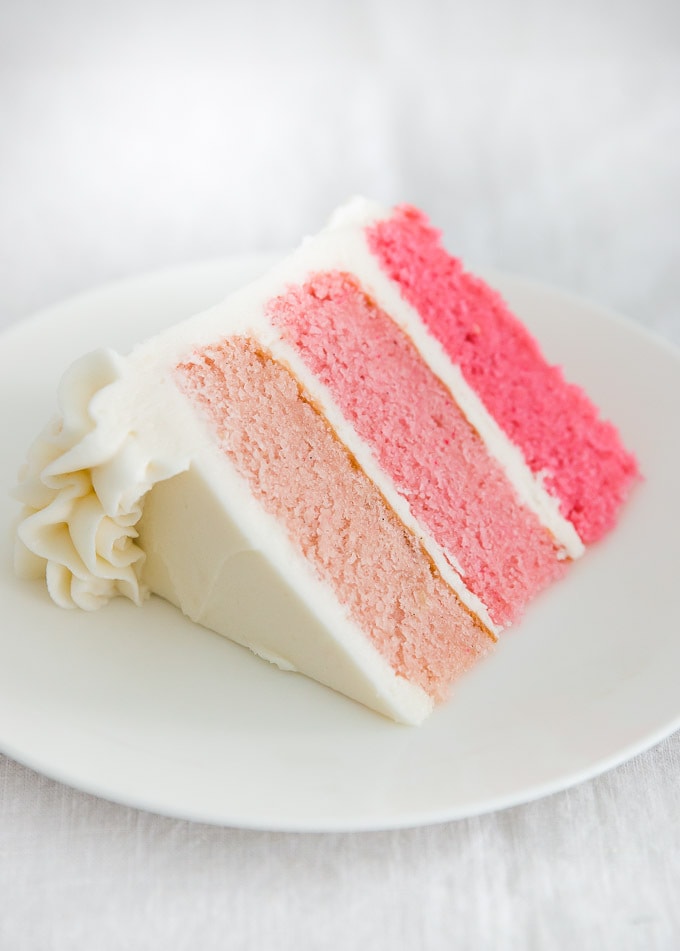
This gender reveal cake is a great idea for disclosing the gender of someone’s upcoming bundle of joy! It’s made of three layers of moist and delicious dyed vanilla cake, and frosted with easy, creamy vanilla buttercream.
While you could easily buy a gender reveal cake at a bakery, I prefer to make everything at home from scratch.
I recently made this gender reveal cake with an ombre effect for a good friend of mine who’s having a baby boy. I used blue dye instead of pink, but it works just the same.
My heart was racing as I watched her slice into the cake – I remember the excitement of finding out the gender of my baby and was so excited for her.
The cake was a hit and it was the perfect way to disclose the gender – she’s over the moon about her upcoming baby!
This is also the perfect dessert for a Barbie-themed birthday cake too!
How to make a gender reveal cake
This ombre cake is my favorite gender reveal cake idea. It’s so pretty, yet simple! The cake is a moist, delicious vanilla cake and the frosting is my classic buttercream recipe.
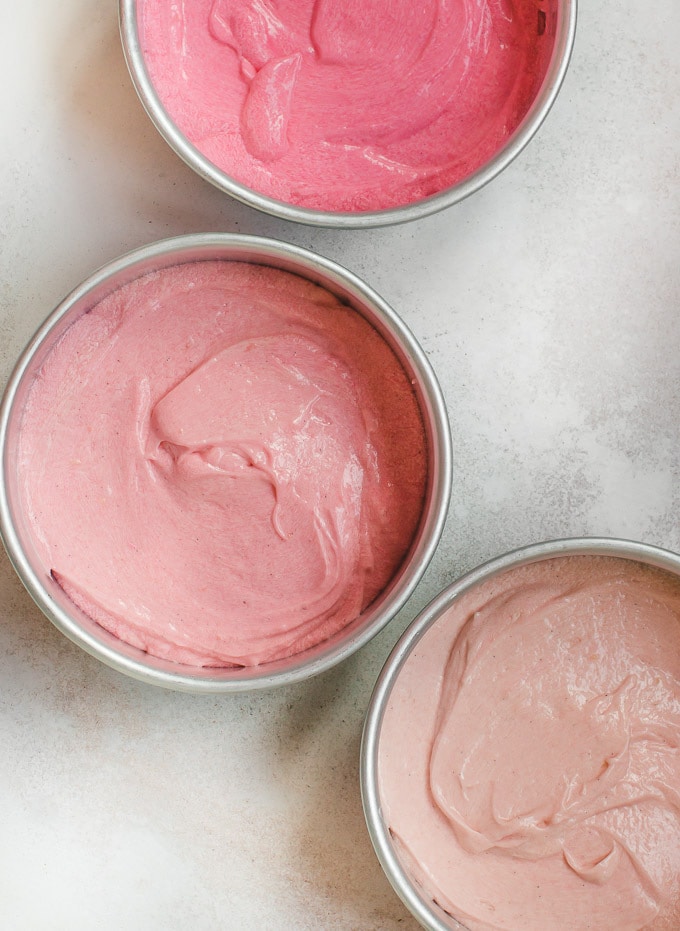
I use a delicious, moist vanilla cake batter and divide the cake batter into three bowls. I like to dye each layer with a different amount of the same food coloring to give the final result an ombre effect. For baby girl gender reveal cakes, I use this soft pink gel food coloring. You can also find it in blue or whatever color you want to dye your cake).
This dye is very concentrated, so a tiny drop of it was all I needed to get the proper color for the first bowl of batter. Then, I added a bit more food coloring to the second bowl until I liked the color. Repeat one final time with the third bowl, creating three distinct pink colors.
To make things even simpler, you can dye the entire batter using the same color (adjust the coloring to your liking) and divide the batter into three. Either way, you will make a gorgeous cake!
Alternate natural cake dye suggestions
Since food dyes can be controversial and cause allergic reactions, you might be looking for another option. The most natural plant-based coloring I know is to use plant-based powders without additives.
Please know that they won’t be as vibrant, more of a pale pink. It’s much harder to achieve the ombre look as that would require a different technique.
Red/pink options include beet powder or dragonfruit powder. Natural dye options might work better in the frosting layers instead.
Natural blue colors do bake with more vibrance. I like to use a combination of blue spirulina and butterfly pea flower.
Tips: Always mix powders in with another dry ingredient first for best color distribution. If you use too much powder, it can throw off the cake batter’s wet/dry ratios resulting in a dense cake.

How to make a smaller gender reveal cake
This recipe makes enough cake batter for a three layer 9-inch cake. If you want to make a three layer 6-inch cake, divide the cake recipe by 2.
You’ll just need to adjust the baking time. Smaller cakes mean less baking, so start checking them for doneness at around 20 minutes.
For any other cake pan sizes, check out my article on converting cake pan sizes. This will help you calculate exactly how much batter to make.
If using 6-inch round pans, I suggest making ¾ of the amount of buttercream if you want thick layers of frosting like you see in the photos.
More of my favorite celebration cakes
- Funfetti Cake with multicolored sprinkles.
- Ultimate Chocolate Layer Cake for chocolate lovers.
- Black Forest Cake for chocolate cherry lovers.
- Red Velvet Cake for a mild chocolate flavor.
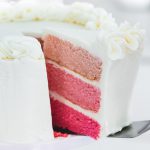
Gender Reveal Cake
A gorgeous, three-layer ombre cake made with layers of moist vanilla cake and classic vanilla buttercream! Use dye to make this cake either blue or pink.
Ingredients
Cake
- 3 cups (420g) all-purpose flour
- 1 tablespoon baking powder
- ½ teaspoon salt
- 1 cup (2 sticks/227g) unsalted butter, softened to room temperature
- ¼ cup (60 ml) canola or vegetable oil
- 2 cups (400g) granulated sugar
- 4 large eggs
- 1 tablespoon pure vanilla extract
- 1 and ¾ cups (420 ml) whole milk
Vanilla Buttercream Frosting
- 1 and ½ cups (3 sticks/340g) unsalted butter, softened to room temperature
- ⅛ teaspoon salt
- 5 cups (600g) powdered sugar, sifted, plus more as needed
- 5 tablespoons (75 ml) heavy cream
- 1 tablespoon pure vanilla extract
Instructions
-
Preheat oven to 350°F/180°C. Butter three 9-inch cake pans, and line the bottoms with parchment paper.
Make the cake
-
In a medium bowl, sift together flour, baking powder, and salt. Set aside.
-
In the bowl of an electric mixer fitted with the paddle attachment, beat butter, oil, and sugar on medium speed until light and fluffy, 3-4 minutes. Scrape down the sides and bottom of the bowl as needed.
-
Add eggs, one at a time, beating well after each addition. Beat in vanilla extract.
-
With the mixer on low speed, add the flour mixture in three additions alternating with the milk in two additions, beginning and ending with the flour mixture. Do not overmix the batter. The less you mix, the lighter the cake will be.
Dye the batter and bake
-
Divide the batter as evenly as possible into three bowls. Add food coloring to each bowl until desired color is reached. Add just a tiny drop at first because food colorings can be very concentrated.
-
Pour each bowl of batter into prepared pans. Bake for 25-30 minutes until a toothpick inserted into the center of the cakes comes out clean.
Allow cakes to cool for 15 minutes, then gently remove from pans and allow them to cool completely on a wire rack.
Make the frosting
-
In the bowl of an electric mixer fitted with the paddle or whisk attachment, beat butter and salt on medium speed until smooth and creamy, about 2 minutes.
-
Add 5 cups powdered sugar, heavy cream, and vanilla. Beat on low speed for 30 seconds, then increase speed to high and beat for 2 minutes. Beat in more powdered sugar if frosting is too thin.
Assemble the cake
-
If the cakes rose too much, cut their rounded top with a knife to make them flat. Set one cake layer on a plate or cake stand.
Once cakes are completely cooled, evenly spread a thick layer of the frosting over the cake to the edge.
-
Top with the second cake layer and spread a thick layer of the frosting. Finish with the third cake layer. Spread frosting over the top and sides of the cake.
Recipe Notes
Note: To use different sized cake pans, check out my article on converting cake pan sizes to learn how to adjust the recipe. To make a 6-inch 3-layer cake, divide the recipe in half and adjust baking times.
Storing and Serving
Store cake in the fridge, but bring it to room temperature before serving. The cake can be made a day in advance.